


Google Search Console is Google's free dashboard for site owners. It shows which searches bring people to your blog and warns you when Google cannot index a page. Setting it up takes about a quarter of an hour: add your site, prove you own it, submit your sitemap, then check the reports. This guide walks through each step.
Before you start #
You need three things: a Google account, the address of your blog, and access to either your domain's DNS settings or your site's HTML. DNS is the system that points your domain name to your server. You change it where you bought the domain, or wherever your host manages it.
If you cannot reach either one, ask whoever runs your site. Verification is the only step that needs it.
Domain property or URL-prefix property #
Search Console offers two kinds of property, which is its word for a site you track. Pick the one that fits your access.
| Point | Domain property | URL-prefix property |
|---|---|---|
| What it covers | Every version: http, https, www, no www and every subdomain | Only addresses that start with the exact prefix you type |
| How you verify | A DNS TXT record only | An HTML tag, an HTML file, analytics, a tag manager or DNS |
| Best for | Owners who can edit DNS | Owners who can edit the site but not DNS |
| Main drawback | Needs DNS access | Misses data from other versions of the site |
We use a domain property for every client site where we can. One property shows all your data, so nothing hides on a version you forgot to add.
Set it up in six steps #
-
Add a property
Open Search Console and sign in with your Google account. Choose Add property. Type your bare domain, such as
example.com, in the domain box, or your full address, such ashttps://www.example.com/, in the URL-prefix box. -
Verify that you own the site
For a domain property, copy the TXT record that Search Console shows you. Add it in your DNS settings as a new TXT record on the bare domain, save, and press Verify. For a URL-prefix property, the quickest way is the HTML tag: paste the meta tag into the head of your home page, publish, and press Verify. You can upload the HTML file to your site's root folder instead.
-
Submit your sitemap
Open Sitemaps in the menu. Type the address of your sitemap, often
sitemap.xml, and press Submit. Most blog engines, Khalid included, write this file for you. An XML sitemap lists every page you want found, so Google does not have to guess. -
Check the page indexing report
Open Pages under Indexing. It shows how many pages are indexed and lists the reasons others are not. A new site needs a few days before this fills in, so come back at the end of the week.
-
Inspect one URL
Paste the address of your newest post into the search bar at the top. Search Console tells you if the page is indexed and which main version of the page Google chose. If it is not indexed, press Request indexing.
-
Add a teammate with restricted access
Open Settings, then Users and permissions, and choose Add user. Type their email address and choose Restricted. They can see most data but cannot change settings or add users. Keep full access for the people who need it.
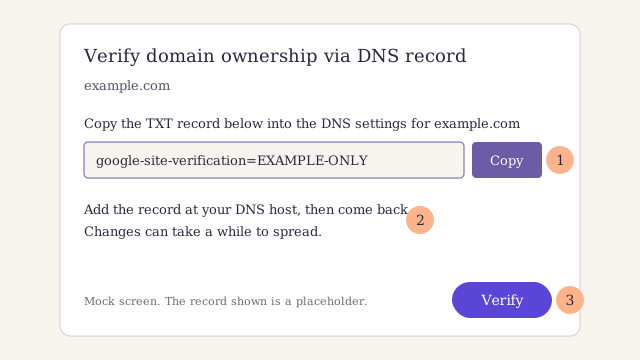
The verification step for a domain property. Copy the record first, add it at your DNS host and wait a few minutes, then press Verify. If it fails, wait an hour and try again: DNS changes can take time to spread.
Google's help page on how to verify a site you own lists every method and what to do if one fails.
What to look at in the first week #
Data in Search Console starts to arrive within a few days. In the first week, look at two things.
First, the page indexing report. If a post you care about is missing, the reason often explains the fix, such as a page marked Noindex by mistake, or a page that redirects.
Second, the performance report. It lists the searches that showed your pages, with clicks and impressions. Do not judge anything yet. Come back after a month, when there is enough data to see a pattern. Our post on what searchers want from a page shows how to read those searches and plan the next post.
Questions about Search Console #
Is Google Search Console free?
Yes. Search Console is free for every site, with no paid plan. You only need a Google account and a way to prove you own the site. It does not change how Google ranks your pages: it shows you what Google already sees, so you can fix problems and spot what works.
How long does verification take?
An HTML tag or file usually verifies at once, as soon as the page is live. A DNS record can take longer, because changes take time to reach every server. If verification fails, wait an hour and press Verify again before you look for a mistake in the record.
Should I also set up Bing Webmaster Tools?
Yes, once Search Console is running. Bing's tool is free and can import your sites from Search Console, so it takes a few minutes. It adds link and keyword reports. Our comparison of the two tools explains where each one wins.
Once you are set up, see our seven picks of free tools for a small blog for what to add next, or read our guide to choosing SEO tools for the full kit.
Numbers from 140 small business blogs, free to read.